Assembling and Disassembling Banner Stands: A Guide
Are you tired of struggling with assembling and disassembling your banner stands? Frustrated with complicated instructions and confusing diagrams? Well, worry no more!
In this guide, we will walk you through the step-by-step process of assembling and disassembling banner stands, making it a breeze for you. Whether you’re a seasoned pro or a beginner, this guide will provide you with all the information you need to effortlessly set up and take down your banner stands.
So, why keep struggling when you can easily master the art of banner stand assembly?
Gather the Necessary Tools
To ensure a smooth assembly and disassembly process, gather all the necessary tools. Before starting the process, take a moment to gather everything you’ll need. This will save you time and frustration later on. The tools you’ll need include a screwdriver, a rubber mallet, and a measuring tape.
The screwdriver is essential for tightening screws and securing parts together. Make sure you have one with multiple interchangeable heads, as different screws may require different sizes.
The rubber mallet is used to gently tap certain parts into place. It provides a controlled force without damaging the materials. This tool is particularly useful when assembling the base or adjusting the height of the banner stand.
Lastly, the measuring tape is crucial for ensuring accurate placement and alignment. It allows you to measure the height and width of the banner stand, ensuring it fits perfectly in your desired location.
Prepare the Banner and Stand
Before you begin assembling the banner stand, make sure the banner and stand are fully prepared. This step is crucial to ensure a smooth and efficient assembly process.
Start by unrolling the banner and inspecting it for any damage or creases. If you notice any tears or wrinkles, take the time to fix them before proceeding. Smooth out the banner and make sure it lies flat on a clean and stable surface.
Next, check the stand for any missing or damaged parts. Verify that all the components, such as the poles, connectors, and base, are present and in good condition. If anything is amiss, refer to the manufacturer’s instructions for replacement parts or contact customer support for assistance.
Once both the banner and stand are in optimal condition, you can proceed with attaching the banner to the stand. Carefully align the holes or grommets on the banner with the corresponding hooks or clips on the stand. Make sure the banner is evenly tensioned and securely fastened to prevent any sagging or slippage during use.
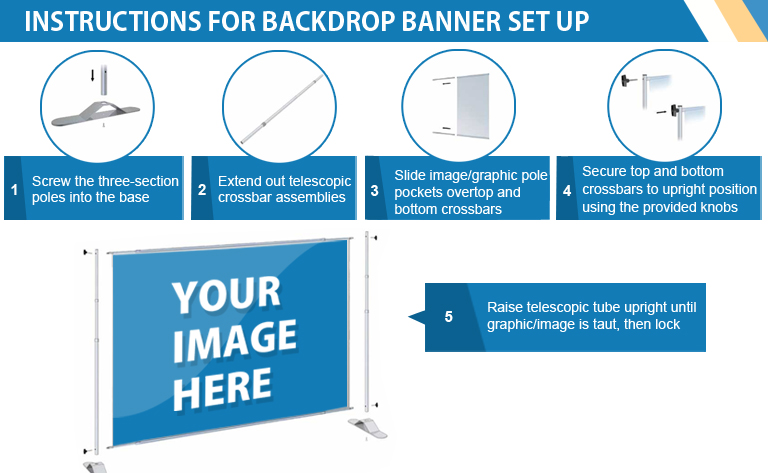
Assembling the Banner Stand
To assemble the banner stand, follow these steps:
1. Attach the first pole:
– Take one of the poles and insert it into the corresponding hole on the base.
– Slide it in until it fits securely.
2. Connect the second pole:
– Take the second pole and insert it into the remaining hole on the base.
– Push it in until it’s firmly connected.
3. Secure the connectors:
– Once both poles are in place, use the provided connectors to secure them to the base.
– Simply slide the connectors over the joints where the poles meet the base and tighten them.
4. Check stability:
– After securing the connectors, gently shake the banner stand to check its stability.
– If it feels wobbly or loose, adjust the connectors until the stand is sturdy.
Adjusting the Height and Tension
Now that the banner stand is assembled and secure, let’s explore how to adjust the height and tension for optimal display.
Adjusting the height of your banner stand is typically done by extending or retracting the telescopic poles. Begin by loosening the locking mechanism on each pole, then gently pull the poles upward to increase the height or push them downward to decrease the height. Once you have reached the desired height, tighten the locking mechanism to secure the poles in place.
To ensure a taut and professional-looking display, it’s important to adjust the tension of your banner stand. Most banner stands have a tension adjustment feature located at the top or bottom of the stand. To tighten the tension, turn the tension adjustment knob clockwise. This will increase the tension and remove any wrinkles or sagging in the banner. If the banner seems too tight or stretched, simply rotate the knob counterclockwise to loosen the tension.
Remember to make small adjustments and check the tension frequently as you tighten or loosen the knob. This will help you achieve the perfect balance between a smooth, wrinkle-free display and a securely held banner.
Disassembling the Banner Stand
Once you have completed your display, it’s time to disassemble the banner stand. Follow these simple steps to efficiently dismantle your banner stand:
1. Remove the banner: Start by carefully removing the banner from the stand. Gently roll it up and set it aside for storage or transportation.
2. Release the tension: Next, locate the tension knob or lever on the stand. Loosen it to release the tension in the frame. This will make it easier to disassemble the stand.
3. Collapse the frame: With the tension released, collapse the frame by pushing the top bar downwards. The telescopic poles should slide into each other smoothly. Continue collapsing the frame until it’s fully folded.
4. Pack it up: Lastly, pack all the components of the banner stand into the designated carrying case or bag. Make sure to secure any loose parts to prevent damage during transport.
Storing and Maintaining Your Banner Stand
After efficiently dismantling your banner stand, it’s important to know how to properly store and maintain it. Storing your banner stand correctly will help protect it from damage and ensure its longevity.
First, find a clean and dry storage space where the stand won’t be exposed to extreme temperatures or humidity. Avoid storing the stand in direct sunlight, as this can cause the graphics to fade over time.
Make sure to remove any dirt or debris from the stand before storing it, as this can cause scratches or damage to the components. If your banner stand came with a carrying case, use it to store the stand. This will provide additional protection and make it easier to transport the stand when needed.
Finally, regularly check your banner stand for any signs of wear or damage. If you notice any issues, such as loose screws or tears in the graphics, address them promptly to prevent further damage.
Frequently Asked Questions
Can I Use Any Type of Banner With My Banner Stand?
Yes, you can use any type of banner with your banner stand. The stand is designed to accommodate various sizes and materials, allowing you to display your desired banner.
Whether it’s a vinyl, fabric, or mesh banner, the stand’s adjustable features make it versatile. Simply follow the instructions in the guide to assemble and disassemble the stand, and then attach your chosen banner.
It’s a convenient and flexible solution for your advertising needs.
How Long Does It Typically Take to Assemble a Banner Stand?
Typically, it doesn’t take too long to assemble a banner stand. The time required may vary depending on your familiarity with the process and the specific type of banner stand you have.
However, with a little practice, you should be able to assemble it fairly quickly. The key is to follow the instructions provided and ensure that all the components are securely connected.
Just take your time and you’ll have your banner stand ready in no time.
Can I Adjust the Height of My Banner Stand After It Has Been Assembled?
Yes, you can adjust the height of your banner stand after it has been assembled. This allows you to customize the display according to your specific needs.
By following the proper steps outlined in the guide, you’ll be able to easily adjust the height to your desired position. Whether you want to make it taller or shorter, you have the flexibility to do so.
Just remember to be careful while making the adjustments to avoid any damage.
What Should I Do if My Banner Stand Becomes Damaged During Disassembly?
If your banner stand becomes damaged during disassembly, there are a few steps you can take to address the issue.
First, assess the extent of the damage and determine if it can be fixed.
If it’s a minor issue, you may be able to repair it yourself using basic tools.
However, if the damage is severe or beyond your expertise, it’s best to contact the manufacturer or a professional for assistance.
They can provide guidance on how to proceed and help ensure your banner stand is repaired properly.
Are There Any Specific Maintenance Tasks I Should Perform Regularly to Keep My Banner Stand in Good Condition?
To keep your banner stand in good condition, there are a few maintenance tasks you should perform regularly.
First, check for any loose or missing parts and tighten or replace them as needed.
Next, clean the stand with a mild detergent and a soft cloth to remove any dirt or debris.
Finally, inspect the graphics and replace them if they’re worn or damaged.
Conclusion
In conclusion, assembling and disassembling banner stands can be a simple task with the right tools and preparation.
By following the provided guide, you can easily assemble your banner stand, adjust its height and tension, and disassemble it when needed.
Remember to store and maintain your banner stand properly to their explanation ensure its longevity.
With these steps, you’ll be able to set up and take down your banner stands effortlessly for your advertising needs.

Welcome to my website! My name is Sebastian Weigall, and I am a passionate and experienced Advertising Consultant specializing in various promotional display solutions such as Banner Stands, Window Graphics, Pop-Up Displays, and Retail Banners. With a deep understanding of the advertising industry and a keen eye for effective visual communication, I am dedicated to helping businesses enhance their brand presence and drive their marketing efforts to new heights.